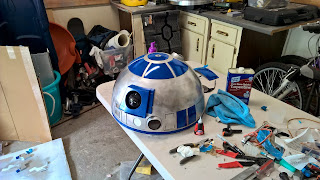
Began sanding and sanding and sanding
The dome is the most recognizable piece to R2 so very important to get it right the first time...
Very important to mark and number your panels with a number so you can easily re-match them to the correct area when gluing them back on or mounting them to the hinges.
Once marked I then removed all the inner panels from the dome using a small metal cutting saw. This allowed me to make roughly 2 back and forth movements before cutting through the little tabs remaining that were connecting the panel to the shell.
What a mess... also note the outer dome is very sensitive to bending without the support of the inner dome. You will need to be very careful not to put too much force or lean on it while cutting.
Aluminum fragments... anything that had the residue left on it from the laser cutting was cleared off using the strong metal brush as seen below... this is very strong and sharp... cut myself many times.
Both pieces fit together very well and remove easy too...
Here is the lower dome pan as well as assembly pieces. I have removed the dome gear from the frame so I can assemble it in the correct order.
Here are a few of the dome pie panel servo hinges...
Installing the hinge requires a few things...
You hand place the hinge inside and move it by hand each time testing clearance of the pie panel hinge back that it clears the opening. This was tough as the hinge backing plate was almost cut to exact size... I ended up trimming down the lower edges to allow easy clearance.
Once in the correct placement, I quickly hot glued the assembly onto the dome inside and allowed it to cool. This allowed me to work on getting all the hinges installed. Once I got them all installed and in the correct placement, I drilled through from the inside out through the hinge to install #4x40 flat head screws to hold the hinges in place permanently.
Since the outer dome covers the inner, it covers the screws as well. To ensure flatness, I counter sinked the holes where the screw heads were to be installed outside in.
A great view of the hinges in place, you can see where I marked the holes connecting each of the hinges.
Once pie panel is not going to open at this time, this is due to money and I will configure it later.
Great shot of counter sink holes where the screws will be inserted.
I then install the screw and tighted down the bolt nut using a screw driver.
While I am in there I screwed through the inner dome to allow connecting the HP shells to the inner dome.
You can see where the inner shells are connecting through the screws and as I connect them down with the nuts, it holds the HPs inside securely.
Great view of all items connected and secured
Ran into some issues, as I was connecting the two domes together, I realized I hadnt cut the port for the camera to view out the radar eye!
Got out the saw and proceeded to almost cutoff my hand :)
Notice the oooops here where the saw kinda flung out... no prob, thank God that is behind the radar eye shell and quite hidden.
The PSI lens area I took 3" pipe, cut it and hot glued to the inner dome area
Purchased 3" 5mm thick lens material to work as a defuser for the lights that will be installed behind.
The upper HP that sits on the exposed pie panel didnt match or align with the holes.. I will hot glue this piece instead.
Started to install the panels against the hinges... note, I use painters tape and sit the pie panel against the hinge... I then flip the dome over and push the hinge against the pie panel and hot glue it temporarily in place...
I then installed the radar eye as well as lens I got from Guy Varden from the R2 builders group.
Here are the dome hinges all opening perfectly.


